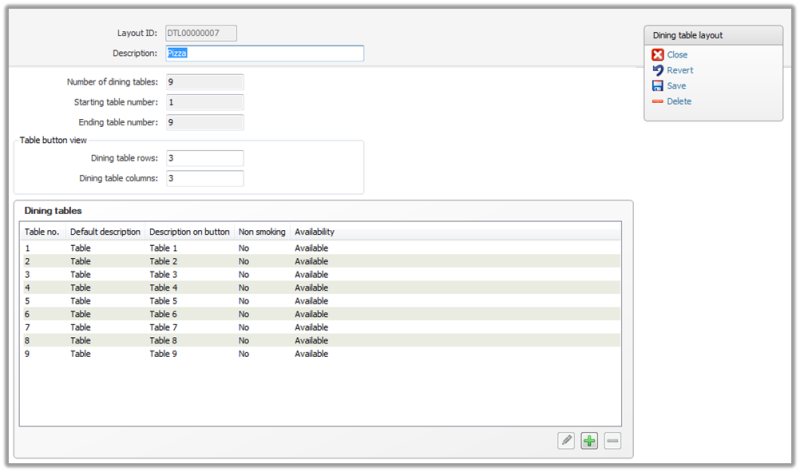
Dining Table Layouts
General setup > Hospitality > Hospitality types > [select hospitality type] > Table button tab > Dining table layout id Edit button
This view appears both when you add a new dining table layout and when you edit one.
In the dining table layout configure how many tables are available and how the description of each table is displayed in the Table view on the POS.
|
Layout ID |
Displays the layout ID. |
|
Description |
Edit the description in this text box. |
|
Number of dining tables |
Displays the number of dining tables on the list in the view below. |
|
Starting table number |
Displays the starting table number on the table view for this hospitality type. |
|
Ending table number |
Displays the ending table number on the table view for this hospitality type. |
|
Table button view |
This area calculates how many spaces there are for tables. If you have 3 columns and 3 rows then there is space for 9 tables. |
|
Dining table rows |
Edit the number of dining table rows displayed on the table button view for the POS. This automatically sets to fit the right number of dining tables. |
|
Dining table columns |
Edit the number of dining table columns displayed on the table button view for the POS. This automatically sets to fit the right number of dining tables. |
|
Dining tables |
This area displays a list of dining tables and their basic settings. |
|
Table no. |
Displays the table’s number. |
|
Default description |
Displays the table’s default description. |
|
Description on button |
Displays the description on the button. |
|
Non smoking |
Displays “Yes” if the hospitality type is set to be non smoking and “No” if it is set to smoking. |
|
Availability |
Displays “Available” if the table is available for use on the POS and “Not available” if the table is not available on the POS.
|
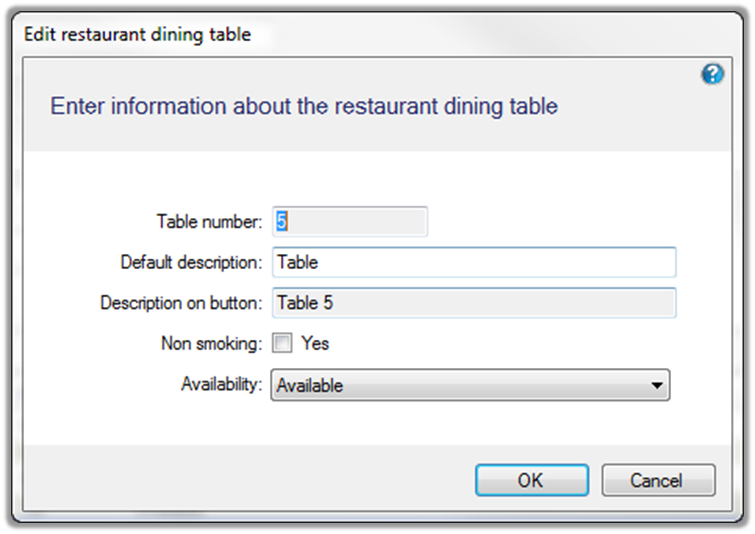
Edit a Restaurant Dining Table
Select a table in the Dining table layout view and click the Edit button. The dialog allows you to change the Default description, indicate whether it is a Non smoking table and if it is Available.
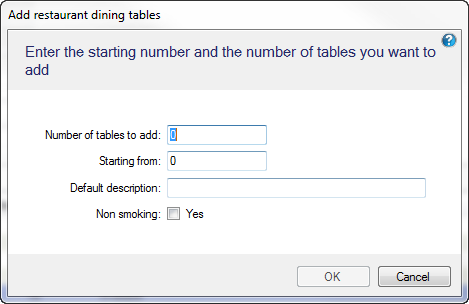
Add a Restaurant Dining Table
Select the Add button in the Dining table layout view to add more tables to the layout. The dialog asks for the number of tables to add and where the table number should start from. A Default description for the tables needs to be entered and if the tables are a Non smoking table or not.
Note: Make sure that you have space for more tables. The Table button view on the Dining table layout view. An error message will come up on the add table dialog if you attempt to add more tables than spaces available.
Split Bill/Transfer Lines Tab
![]()
|
Split bill POS menu group |
Select the menu group to be displayed in the Split Bill view on the POS. |
|
Transfer lines POS menu group |
Select the menu groups to be displayed in the Transfer Table view on the POS. |
|
Max guests per table |
If set, the operation Split even will automatically use the value to split the payment. If set to 0, the operation will ask the user in how many parts the payment should be split. |
|
Combine split lines action |
Set whether a split bill can be combined after being split.
|

